

Skiing is more than just an exhilarating way to see the mountains; it’s a power house workout that transforms your lower body. But to truly enjoy the ‘burn’ without the ‘break’, you need a plan that covers everything from pre-trip prep to post-piste recovery.
1. The Muscle Payoff: More Than Just Quads
Skiing is essentially an extended squat session, making it one of the best ways to tone and strengthen your entire lower body.
- Quadriceps: These absorb the shock of every bump and power every turn.
- Glutes: Yes, skiing is excellent for your glutes. They work constantly to stabilise your pelvis and maintain your balance in that crouched position.
- Hamstrings & Calves: These muscles act as stabilizers, protecting your knees and helping you control speed and direction.
- Inner/Outer Thighs (Adductors/Abductors): Essential for lateral control and keeping your skis parallel.
2. Prepping for the Slopes: Strengthening Exercises
Don’t wait until you’re at altitude to wake up your muscles. Aim to start these 6–8 weeks before your holiday:
- Wall Sits: Build the endurance needed for long runs and stop that ‘burning’ sensation early in the trip.
- Squat Jumps: Increase explosive power in your glutes and quads for sharp turns.
- Lunges: Improve balance and coordination, mimicking the weight transfer between legs.
- Planks: A strong core is vital to protect your lower back and keep you upright.

3. Impact & Protection: Ankles, Knees, and Hips
The twisting forces of skiing primarily target the knees. While ski boots support the ankles like a splint, they often redirect that force directly to the knee joints.
- Counteract the Impact: Maintain a ‘forward’ stance with slightly flexed joints. Leaning too far back puts excessive pressure on the knees.
- Gear Matters: Ensure your skiing pants are windproof and waterproof to prevent muscles from seizing up in the cold. Look for Salomon Ski Pants or North Face options that offer thermal insulation without restricting movement.
Pro tip: Staying dry = staying warm. Wind + damp fabric can make muscles feel tight and sluggish faster.4. Post-Ski Recovery: The ‘Leg Lift’ Ritual
Treating your legs after a day on the mountain is the secret to waking up without stiffness.
- The Bath Ritual: Soak in a warm bath with Epsom or magnesium salts. This helps expand blood vessels, shift lactic acid, and reduce inflammation.
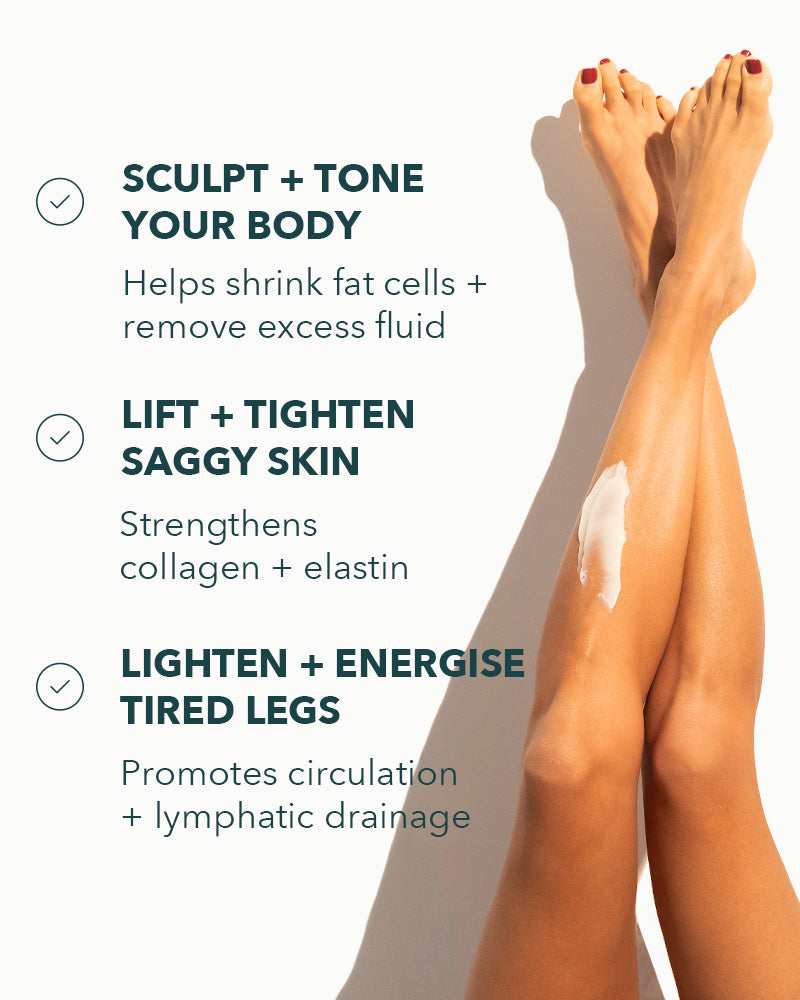
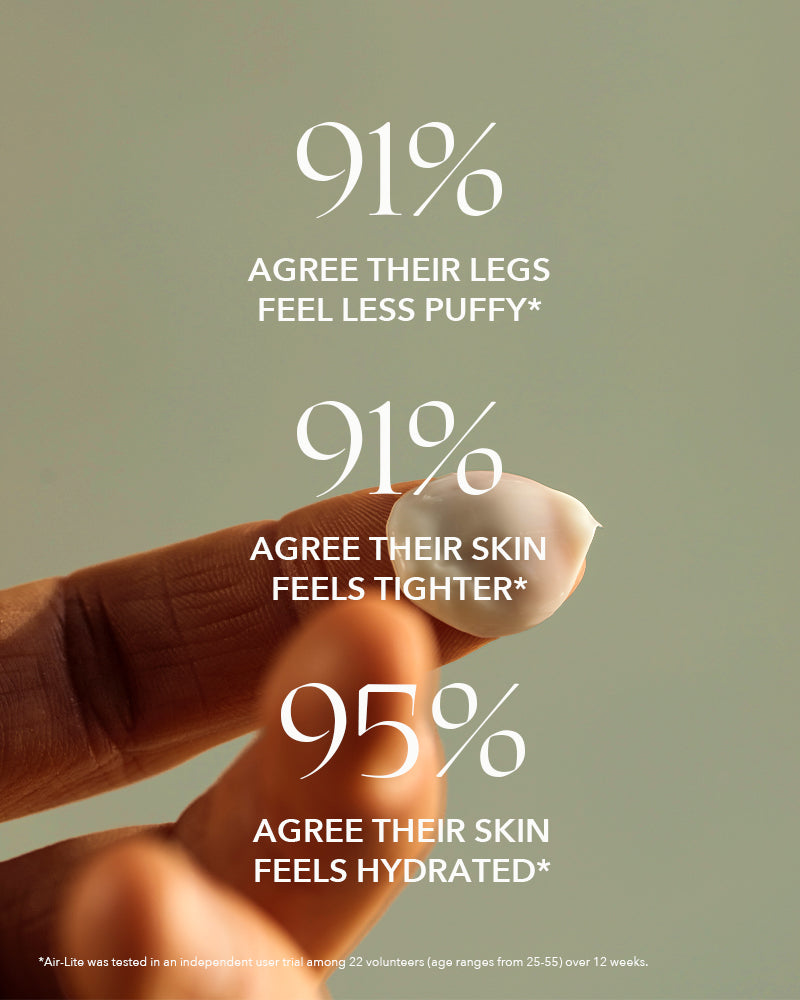
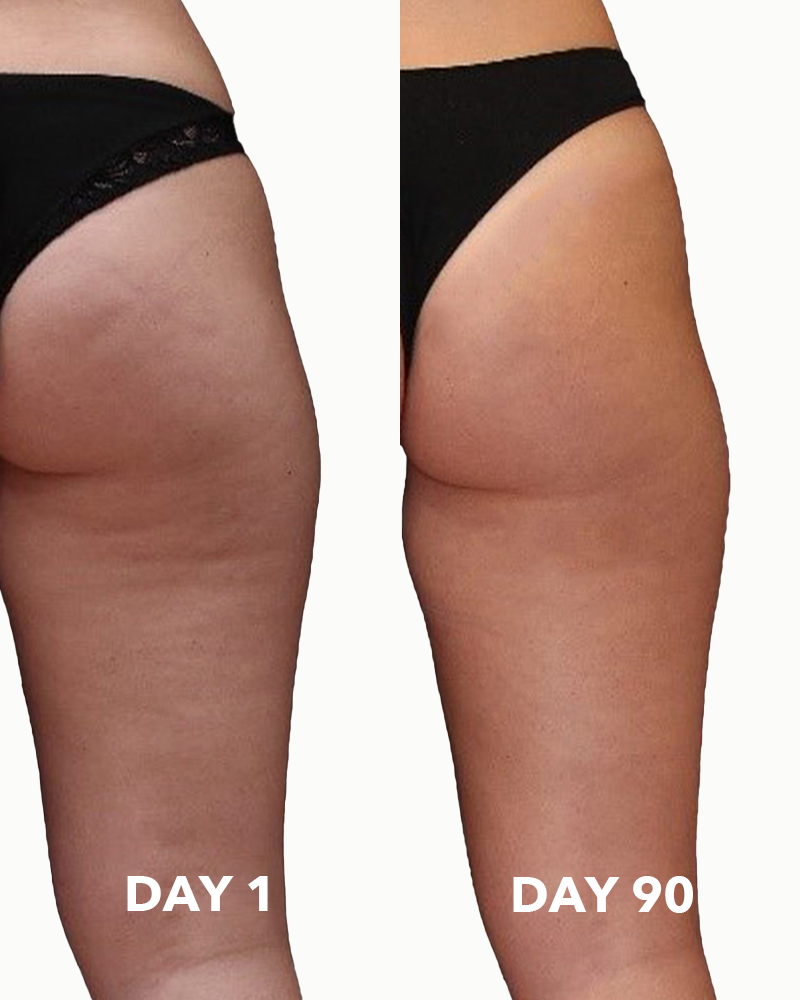
- Apply Legology Air-Lite: Apply to weary limbs. This contouring cream uses deep drainage benefits to reduce puffiness and fatigue. For maximum effect, apply it in upward strokes from ankles to buttocks.
- The ‘V’ Move: After applying Air-Lite, lie flat with your feet up against a wall for 10 minutes. This encourages fluid to travel back up your legs, instantly rejuvenating tired pins.

The 15-Minute ‘Piste-Ready’ Circuit
To jumpstart your pre-ski conditioning at home, this 15-minute circuit targets the specific muscle groups needed for stability and endurance on the slopes. Perform each exercise for 45 seconds, followed by 15 seconds of rest. Complete the entire circuit twice.
- Air Squats: Stand with feet hip-width apart. Focus on pushing your hips back as if sitting in a chair, keeping your weight in your heels to fire up your glutes and quads.
- Lateral Skaters: Mimic the side-to-side motion of carving by jumping laterally from one foot to the other. This builds the lateral strength needed for edge control.
- Wall Sits: Lean against a flat wall with knees bent at a 90-degree angle. This isometric hold builds the "burn" endurance required for long runs.
- Forward or Reverse Lunges: Step one leg out and lower your hips until both knees are bent at a 90-degree angle. This improves balance and single-leg stability.
- Plank with Leg Lifts: Hold a standard plank position and slowly lift one leg at a time. This engages your core and lower back, preventing you from falling into the "backseat" position while skiing.
- Jump Squats: Perform a standard squat, then explosively jump upwards. This develops the power needed for navigating bumps and moguls.
- Calf Raises: Stand on the edge of a step and lift your heels as high as possible. This strengthens the ankles and calves for better boot control.
- Glute Bridges: Lie on your back and lift your hips toward the ceiling. This specifically targets the glutes and hamstrings to support your knees.
Quick Tips for Success
- Warm Up: Spend the first 2 minutes doing light movement like knee-to-chest walks or leg swings to prepare your joints.
- Consistency: Aim to perform this routine 2–3 times a week leading up to your trip.
- Cool Down: End with a 5-minute stretch focusing on your hip flexors and hamstrings to maintain mobility.
The Best Ski Pants for Keeping Your Legs Warm
The best ski pants for keeping your legs warm are insulated pants with high-performance synthetic fills like PrimaLoft or a thermal fleece lining, paired with a quality waterproof/windproof outer shell material.
Key Features for Warmth
- Insulation Type: Synthetic insulation (like PrimaLoft or Thinsulate) is preferred over down as it retains its insulating properties even if it gets damp from sweat or wet snow. The warmth is often measured in grams (g/m²), with a mid-range of 40g to 60g being ideal for most resort skiing conditions, offering warmth without excessive bulk.
- Waterproofing & Windproofing: A durable outer membrane (such as Gore-Tex or a brand's proprietary tech like The North Face's DryVent) is crucial for blocking out wind and wet snow, as staying dry is essential to staying warm.
- Fit and Features: A well-fitting pant, or a bib style that extends higher up the torso, helps trap heat and prevent snow from getting in. Features like inner thigh vents allow you to regulate your temperature if you start to overheat.
Should Ski Boots Hurt Your Shins?
Definitely not. If they do, you are likely experiencing ‘shin bang’ (tibia pain or bruising) or ‘shin splints’ (muscle inflammation). While some early-season tenderness is common as legs adjust to the pressure, sharp or lasting pain usually stems from poorly fitting boots or improper technique.
Why Do Your Shins Hurt?
- Boots Too Big: If your foot slides around, your shin repeatedly bangs into the boot tongue with every turn.
- ‘Backseat’ Skiing: Leaning too far back pulls the shin away from the tongue, causing impact when you shift forward, or overstrains the anterior tibialis muscle as it fights to keep you upright.
- Improper Gear: Thick socks, wrinkled base layers, or jeans tucked into boots create painful pressure points.
- Buckling Errors: Buckles that are too loose allow too much movement, while overtightened buckles can pinch nerves and circulation.
Quick check: Your shin should feel supported against the tongue when you’re in a forward stance—not smashed, pinched, or bruised.
Overnight Recovery Routine
If you have a bruised or inflamed shin but want to hit the slopes the next day, follow this intensive recovery plan:
- Ice Immediately: Apply an ice pack for 15–20 minutes several times during the evening to reduce swelling and numbing the pain.
- Soak & Salt: Take a warm bath with Epsom or magnesium salts to relax the surrounding muscles. Follow this with an alternating "contrast" shower (cold and warm water) to stimulate blood circulation and nutrient delivery to the tissues.
- Topical Treatment: Use anti-inflammatory creams like arnica or Legology Air-Lite to soothe and de-puff the area. For deeper muscle relief, some skiers use tiger balm or peppermint oil.
- Gentle Soft Tissue Work: Foam roll your calves and hamstrings very gently to release tension. Avoid rolling directly over the bony, bruised part of the shin, as this can worsen the inflammation.
- Elevation: Sleep with your legs slightly elevated to encourage drainage and reduce any ‘heavy’ feeling or puffiness. Even resting your feet on a pillow or raising the end of your mattress an inch can work reparative wonder.